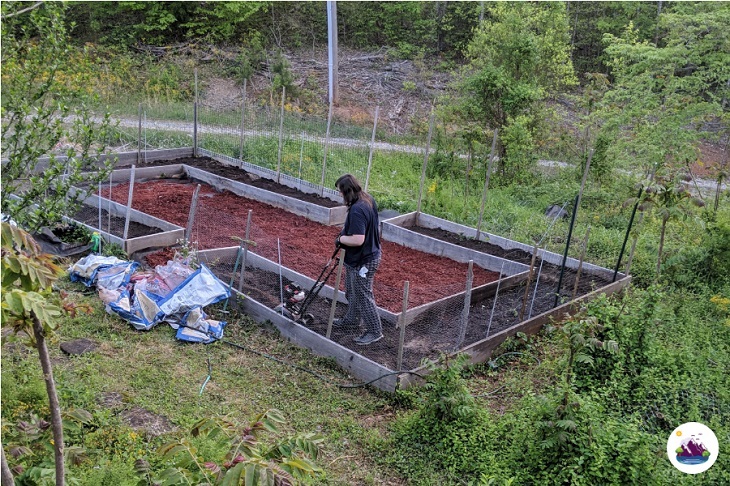
Raised gardening is a fulfilling and fun task. This post aims to guide you on how to create your own raised garden bed - without spending a lot of money!
Team member, Anne shares practical tips on building a raised bed and design instructions along with many different ways to keep the costs down.

“The glory of gardening: hands in the dirt, head in the sun, heart with nature. To nurture a garden is to feed not just on the body, but the soul.”
- Alfred Austin -
My daffodils are starting to bloom, despite the snow flurries and below freezing weather overnight here in the beautiful Foothills of North Carolina.
This can only mean one thing — spring is just around the corner!
That time when you get your gloves on and put your gardening skills to the test. If you're looking to create a garden in your backyard, but the soil is sandy, hard-packed, or clay (or, if you don’t have a lot of room), you don’t need to worry.
There are ingenious ways you can still plant your favorites like vegetables, herbs, fruits flowers and ornamental plants in a raised garden!
Learning how to successfully grow plants in a raised bed has been a journey for me — and I am still learning. And trust me, I have made many mistakes along the way. Like planting all 6 of the zucchini plants that come in the package thinking I would get more fruit (just because I didn't want them to go to waste).
Nope! All I got was a lot more work and leaves covered with powdery mildew because they were too close together.
Another mistake... growing my cukes on trellis right behind them. At the start of the season, a bountiful harvest and lots of brine fermented pickles but then the mildew from the squash traveled (because the plants are in the same family). Duh!
In this post I share some things I have learned along the way, including money savings tips and how to build your first raised garden bed. Enjoy!
Quick Links - DIY Raised Bed FAQS
In this article we hope to answer the most frequently asked questions about how to build a raised garden bed. Want to go directly to a question? Click the link.

What is a Raised Bed Garden?
Using Raised Beds for Your Vegetable Garden | Courtesy of Eden Brothers
Simply known as a raised bed, a raised garden bed is a planting container that’s designed to sit above the ground. This term can refer to different types of raised beds such as supported raised beds and containerized raised beds.
But the one were going to be talking about predominantly in this article is a raised ground bed (although most of this information can apply to the other types as well). Think of it as a large box with no top or bottom, supported by a wooden, plastic, or metallic frame.
As much as these gardens are effective, the challenge for most gardening enthusiasts is building one from scratch. Many people ask themselves questions like: how far should the garden be raised from the ground? How strong should the frame be? What materials are perfect? Will I spend too much money building one?
This post aims to guide you on how to build your raised garden — right from the tools and materials you need, to the appropriate measurements, and how to get your plants started.
Before I get to the steps for building a raised bed, it’s wise to learn a few things about why a raised garden would be a great addition to your home, how big your garden should be and things you will need to get started.
Benefits of a Raised Garden
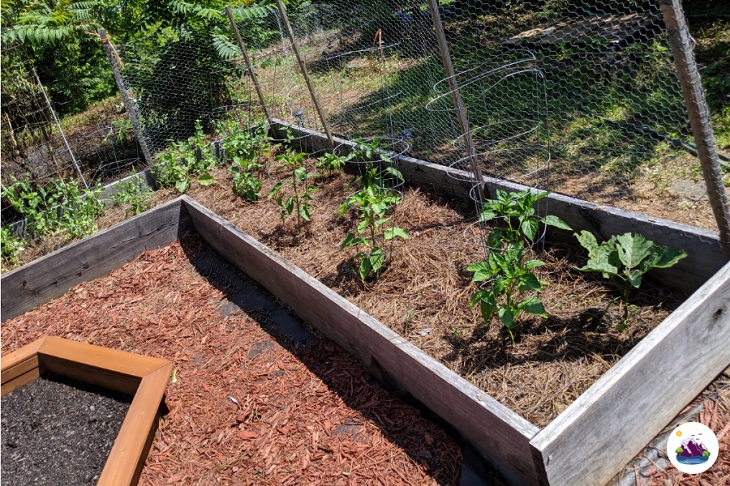
Proper spacing is important in a raised bed . You need fewer plants, but they will bear more fruit.
There are dozens of reasons you may want to construct a raised garden in your yard.
One top reason is to enjoy fresh vegetables and fruits directly from your own garden, and of course, the pleasure and pride that comes with getting involved in growing plants.
But there are many more that might convince you to choose raised bed gardening, over planting a traditional garden. Let’s talk about some of them…
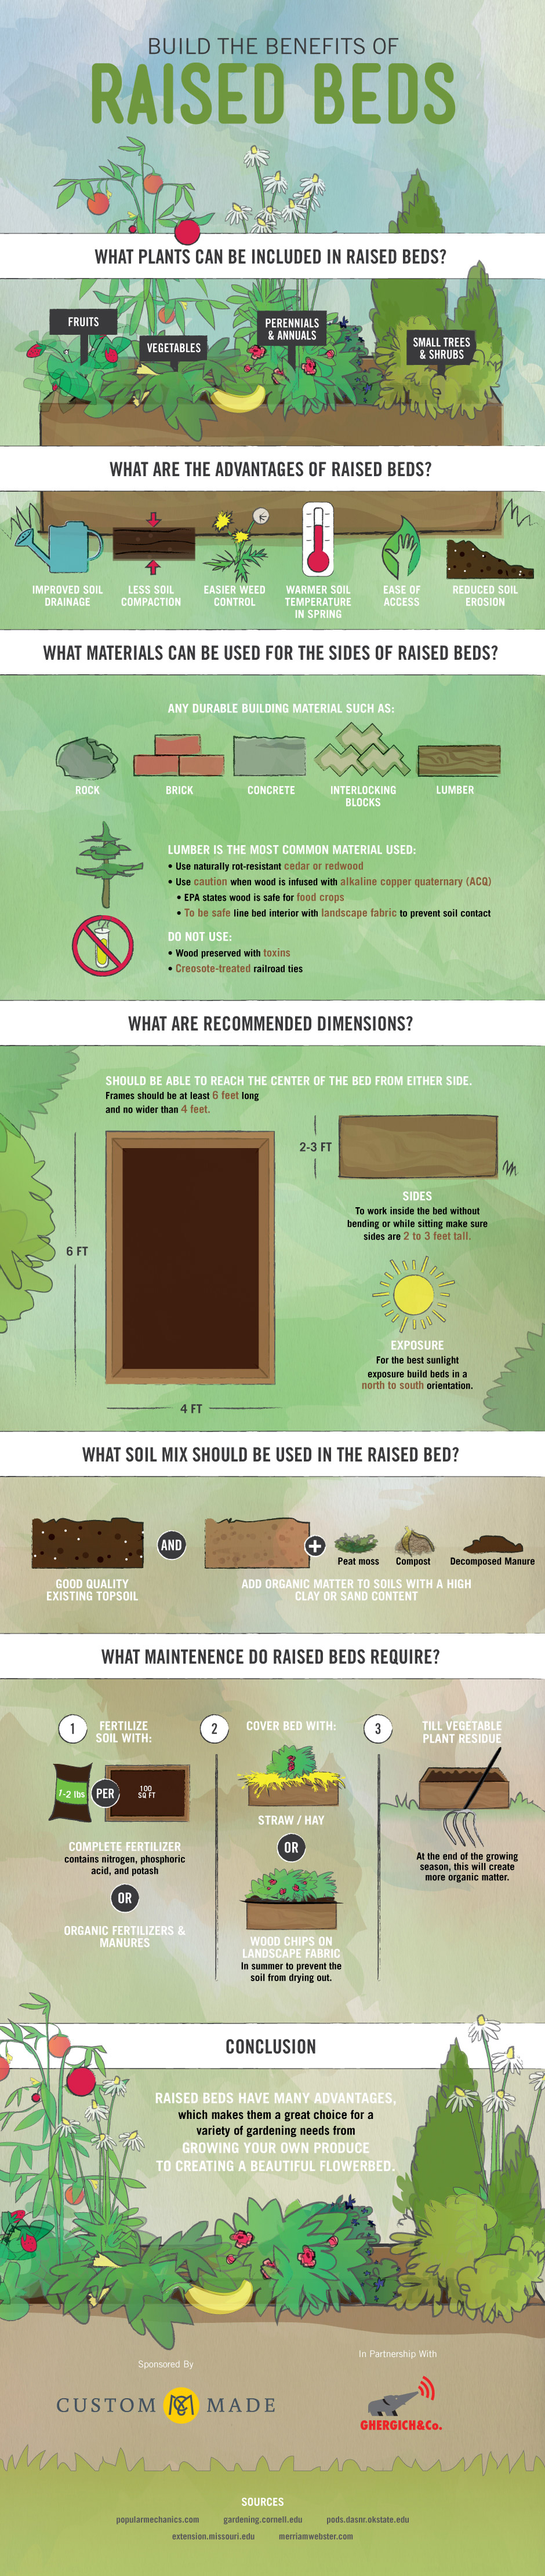
Build The Benefits of Raised Beds | Infographic by CustomMade
Things to Consider Before You Start Building Your First Raised Bed Garden
So, you're sold on the benefits of raised bed gardening and are ready to start building, but hold on...
Before you head to the lumber yard, there are a few things we need to discuss to ensure success — especially if you are on a budget and don't want to spend more than you have to.
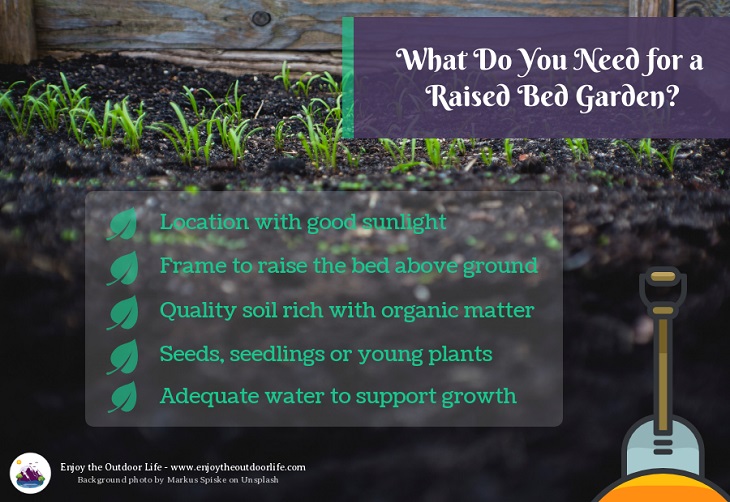
What You Need for a Raised Bed Garden | Infographic by Enjoy the Outdoor Life
What's the Best Place to Put a Raised Bed Garden?
This topic was covered pretty extensively in another article, so I'm just going to say that you need to pick a spot with good sun, quality soil and where it will get enough water. In terms of the soil, unlike a traditional garden, with a raised bed, you are in complete control of that.
As far as watering goes, you want to pick a location that's not too far from your main water source — aka the good ol' garden hose. For larger beds, many serious gardeners choose to install an irrigation or drip hosed system to reduce manual watering.
Another option? Purchase a rain collector barrel (many of which have spigots for attaching a hose). Not only is this great if your perfect spot far away from the house, but it's also environmentally friendly. Depending upon how much rain you get, and the rates you pay for water, the initial investment could also save you money in the long run.
How Big Should a Raised Garden Bed Be?
When it comes to size, it’s really about how much space you have at home and what kind of plants you want to start.
However, the common size of a garden bed is 4 feet (width) by 8/12 feet (length). Whatever size you choose to go for, ensure that you can access every corner of the garden without stepping into your bed. There’s no point of having nice, leafy veggies, but you can’t harvest them easily because some areas are hard to reach.
When it comes to depth, the minimum should be around 6 inches. You see, for most plants to have healthy roots, they need at least 6 to 12-inch deep soil, so anything between those figures would be ideal.
Bonus: If you follow the principles of square-foot gardening, even a small raised bed can yield a bountiful harvest of your favorite vegetables and herbs.
How Much Will It Cost to Build a Raised Bed?
It would be great if I could give you an exact answer to how much it will cost to build a raised garden bed in your yard, but the reality is that this depends upon many things.
I cringe every time I see "build a raised bed for $20" (or whatever the super cheap variation is) because of how misleading many of those articles are. Typically, when you look further they are super small beds and don't include the cost of soil or plants.
Now, this is not to say that building a raised bed garden will be expensive. It all depends upon things such as size, materials and whether you have the things you need to build them on hand.
To help you figure out the costs to build your own raised bed garden, let's first take a look at what you will need for a basic raised bed:
- Construction tools
- Material for the frame
- Materials to hold the frame together
- Soil and organic matter
- Gardening tools
- Mulch and weed barriers
- Seeds, seedlings or young plants
Let's break this list down to see where the biggest expenses are, as well as ways you can save money when you decide to give raised bed gardening a try.
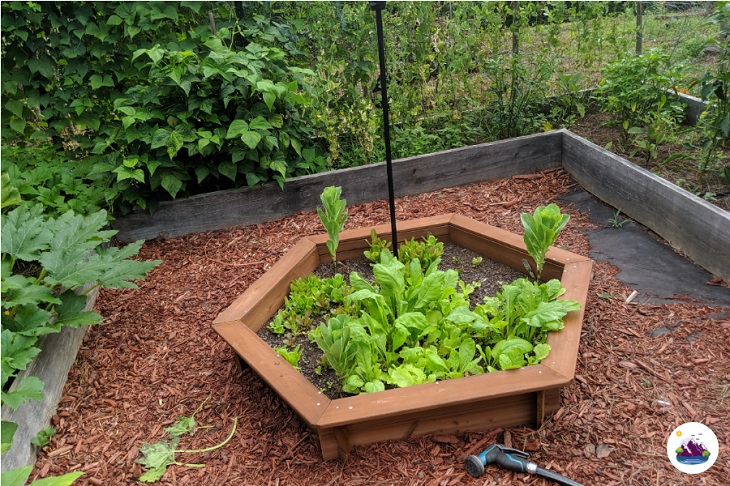
I used this cedar sandbox as a raised bed for my salad greens — it comes apart easily if I want to move it.
Construction Tools Needed to Build a Raised Bed
Unless you're purchasing a raised bed garden kit (and there are many inexpensive ones available), you will need a power saw to cut the larger pieces of wood. If you don't have one, the good news is that most major hardware stores like Lowe's and Home Depot will cut the wood on premise for you. You just need to know your sizes in advance. If you're cutting the wood yourself, you will need measuring tape and a T-Square to ensure straight lines for cutting.
Another "must have" is a power drill. This is absolutely not a job you can do with a screwdriver or hammer. If you are using pressure treated wood, you are also going to need a drill bit that's a size or two smaller than the actual screws you will be using to attach the pieces together.
And if you are not sure about what kind of drill to get, ask for help. Don't make the mistake I did the first time by not getting a drill that was powerful enough to go through pressure treated wood. The job took much longer than it needed to for sure!
If you don't have one, a drill is a handy tool to have around the house. I you don't think you will need it for any other major projects, you can get one that's decent enough to do the job for under $50 (but again, do make sure it's powerful enough for the wood you are using).
Optionally, you may want to pick up a level to make sure that your final raised bed frame lays straight and even. Another good idea is to have some clamps to hold wood together while you are building.
Money Saving Tips
Check with your neighbors. If no one has any of these tools to borrow, consider talking to them about how exited they are about your first garden bed. If you're lucky, they will catch your excitement and you can chip in together on the bigger expenses.
Plus, you can set up a plan to help each other build the frames, because you will need more hands at different stages of the process.
Materials to Build the Frame of Raised Bed
Wood is one of the most readily available, and most common, materials for building garden bed frames — but you can’t just go for any lumber.
You need wood that will last without succumbing to water or insects — otherwise you will need to replace the frame every few years. You also want wood that's safe for plants, especially those edibles.
If you don’t have access to wood or want to keep things simple and more affordable, you can use alternatives such as rocks, bricks or concrete blocks. Beware, though, the concrete will raise the PH of your soil with time, so you have to keep on changing it every time you are planting new plants.
The cost of the wood will depend upon what type you choose, as well as the overall size and height of your bed. For example, cedar and redwood will cost more than pine in terms of initial expense. However they last much longer, meaning they won't have to be replaced. The cost will also depend on the width (what will be the height of your bed).
Can you use logs to make a raised bed frame to save money?
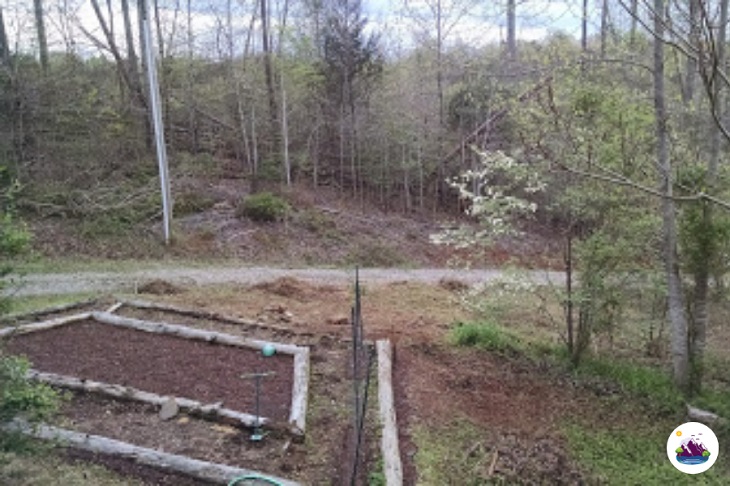
My original raised bed built with logs looked like this before I tore it down to build a permanent bed.
Yes, logs can be used to build a raised bed, but this is only a temporary solution.
When I built my very first raised bed garden, I was renting a house wasn't sure how long I was going to be there. I really wanted a garden, but the soil was that awful red clay, so I knew it wasn't going to be good for traditional gardening.
But to be quite frank, I didn't want to spend a lot of money. Right around that time, the electric company had come through my area, cutting down pine trees that were interfering with the lines. With permission, I grabbed a friend with chainsaw. We cut manageable sized logs and hauled them to my garden area with a tractor. I arranged them into a makeshift raised bed frame.
Even though this was a "temporary" raised bed it lasted 3 years before the logs started to deteriorate (much faster than normal, because of the consistent contact with the water and soil).
The good news? When I was ready to build my real raised bed, I was able to pull out the big chunks, and till the rest right into the ground creating my own organic matter.
Money Saving Tips
Take a look around your local lumber yard or hardware store and see what the different lengths are available, for example 10 feet, 12 feet, or do they have even longer? Then, instead of having a pre-set exact size for your bed based upon the best prices, then work backwards. There are 4 sides to a basic bed. Instead of buying 4 pieces, think of ways you could cut two longer pieces up, to make the different sides.
Going for a smaller bed?
You could cut one 12 foot board into four pieces (plus they can do it there and it's likely to fit even in a small car). Want a longer, rectangular bed? That same 12 foot board could be cut into 8 feet and 4 feet, or 9 foot and 3 foot pieces. You would simply need two 12-footers instead of one.
Make sure you do some comparison shopping because, depending on sales, it might be less expensive to use shorter boards even though you may not use it all. Sometimes instead of going for a 12" height using a single board, it might cost less to use two stacked 6" boards per side. You will need to do the same thing for the corner and side supports.
For more information on what you will actually need to build the frame, I spell it out in the step-by-step instructions below.
Do you want a taller bed, but can't afford the cost right now?
In the section about advanced raised bed design I share a strategy where you can start smaller and expand later. It's simply a matter using longer corner and side supports.
Here are some additional tips to help you pick the best wood for your raised garden.
Choosing the Right Wood for Your Raised Bed
The Do's:
The Don'tS:
Whenever possible, go for locally-sourced and sustainable wood!
Materials to Hold the Raised Bed Frame Together
While some plans recommend galvanized nails, my recommendation is wood screws because the hold the bed together better and longer. But they can't be any ol' screws you have laying around. Ideally, you want screws that have been coated to withstand water and elements from being outside, such as decking screws. For the main support, you need screws that are long enough to go completely through the width of the side panel and at least two inches into the next board.
Your raised bed is also going to need corner supports. There are two common options for this: using wood or using metal corner brackets or braces.
If you will be following my instructions for either adding side supports that will go into the ground to hold your bed in place, or adding posts to add a chicken wire frame for peas, bean, cucumbers and other vining plants, you will need shorter screws that will attach these posts to the side panels without going through the other side.
If you are adding the chicken wire, screening along the bottom edge of your bed or plastic along the interior walls to protect the frame from damage, you will also need a heavy duty staple gun and staples.
Money Saving Tips
If you know anyone in construction, or who has recently built a deck, ask if they have any extras. Or, if you have convinced your neighbors to build raised beds too, screws are cheaper in bulk.
Another option?
Check out prices for raised garden bed kits, which come with all the materials you need to build the frame, and do some comparison shopping. If you are pressed for time (or don't have all the necessary tools), pre-cut raised beds are much quicker to build since it all comes ready to go (and depending upon the size of your bed, the overall cost may be less, or at least come close when you factor in the time saved). You'll probably still need that drill though.
Soil and Organic Matter to Fill the Raised Garden Bed
Depending upon the size of your bed, soil is probably going to be your biggest initial expense. One way to cut down on this cost is to check the quality of your base soil where the bed is going. We'll talk about this more when we get to the instructions for building your raised bed. But if the soil composition is good, either as is or with some amendments such as adding organic matter, sinking your raised bed into the ground some means less soil you will have to purchase.
To help determine you will need, you can use a mulch and soil calculator. You will only need to enter an estimate of the coverage area, choose a mulch type, enter the mulch/soil depth, and boom! You get your perfect quantities.
Finally, if you don't already, start composting now and make your own nutrient rich organic matter. It won't be ready for the initial fill, but you will have plenty to support on-going growth and to supplement
Money Saving Tips
Watch for sales! Yeah, I know Captain Obvious.
Many online store offer both discounts and free delivery right to your home, meaning you won't have to take multiple trips (unless you have a truck). You may also want to contact a local landscaper or company that sells soil and organic matter by the truckload. Just make sure that what you are getting is garden quality soil, not "fill dirt."
This is another area where that neighborhood group can help share costs.
Not sure where to look?
Most areas have a master gardener association, cooperative extension, or 4-H type club that might be able to help. If you live in a more rural area, you could also ask local farmers to see if they have any "garden ready" manure.
Another way to save money on soil the first year, is to start with a shorter bed which means you need less to fill it. Then, next year, build up following the advanced bed design instructions below.
Finally, for a more "temporary" solution, if you don't have enough money to buy the best quality soil to fill the entire bed, start with a decent mix.
Then, in the spots where you are actually putting the plants, dig a hole several inches around on all sides (deep enough and wide enough for the roots) and fill it with high quality soil. Think of this as kind of "container gardening" but in the ground. Next year, before you start planting, till the garden bed and add additional better soil and/or organic matter as needed.
For deeper beds, use principles of Hügelkultur (discussed further on).
Gardening Tools for Planting and Maintenance
When first planting your raised bed, at the bare minimum, you're going to want a small shovel/trowel, a pair of pruners and some good garden gloves. You will also want a strong garden shovel, and maybe a garden rake, to fill the bed and even out the soil.
Now, if you are using the ground where your bed is placed as part of the growing medium, it will need to be tilled before adding the filler soil and organic matter. If it's a small bed, a traditional manual tiller will be enough to get the job done. Otherwise, as mentioned previously, you may want to consider a rototiller. When you're ready to plant next year's garden (as well as at the end of the growing season if you want to work in the organic matter from the plants and the mulch), you will definitely need some type of tiller.
Another useful "starter" tool is a small, handheld tiller/rake — especially if you haven't put down mulch to prevent weeds and have left the task go for too long. It's also useful for digging up vegetables that grow underground like potatoes, yams, onions and carrots.
While not technically a "tool," you will also need to have a hose with a nozzle that offers different levels of spray. Some gardeners opt for soaker hoses (which I personally use in my raised beds), drip irrigation kits or sprinklers to automate some of the watering process. If you use one of these methods, you need to make sure that you group plants with the same water requirements, and adjust the water volume accordingly.
Money Saving Tips
Start with the basics, and then watch for sales (especially end of season ones) for the rest. Garage sales, yard sales, flea markets and thrift shops are also great places to look for used garden tools. Who knows, you might even find an antique that will become one of your favorites.
Mulch and Weed Barriers to Cover Your Raised Bed
Once you've planted your garden, we strongly recommend that you put down a layer of mulch. Now we're not talking about the wood chip kind, but rather pine needles, straw or hay (each has it's own pros and cons). Not only does this help keep moisture in and keep soil temperatures cooler, but a good 2 inch layer will prevent just about all weeds from growing (because they need light to grow).
Optionally, you may want to add a layer of weed barrier fabric cloth or wire-mesh screening along the edge or bottom of your raised bed, before you add soil. For an organic option, use cardboard which will break down over time and add nutrients to your soil. We discuss the when's and why's for this extra protection in the "how to build a raised bed" section.
Money Saving Tips
Check with local farmers and see if they have "garden" ready hay or straw you can use. Just make sure it's free from mold and mildew, and isn't full of slugs or other bugs. It's also a good idea to make plans for the end of the season, to get some additional mulch for over-wintering your garden bed.
Don't forget to place your order for next year (or take enough home with you if you have the space to store it).
I have Celiac, which means I have to be completely gluten and wheat free. Because I don't want to run the risk of any loose wheat seeds or wheat dust left over from cutting contaminating my veggies, I use pine "straw" for mulching my food gardens.
Sometimes I buy it (because it's relatively inexpensive), others I go right into my nearby woods and collect fallen pine needles for free. Not only does it keep out weeds, but the way the needles form a mat really helps the soil retain moisture.
Plants for Your Raised Bed Garden
Finally, we get to the star of any garden. The plants!
This isn’t going to be a big discussion of what plants to pick and why, because that's a subject worthy of a future article. For now, one important thing to consider is the idea of companion gardening, especially if you're starting with a smaller raised bed.

Being a Jersey girl originally, nothing tastes better than a tomato straight from the garden!

When it comes to choosing vegetable and herbs for raised bed gardening, there are some plants that play nice with each other, and others that don't. For example, last year, I made the mistake of planting all of my peppers right in front of my beans, which as it turns out, is not a good combination.
If you're starting small, go for vegetables that have the most bang for the buck. Ones that have a high yield per plant (and related to the amount of space they take up in the garden). You also want to pick varieties that are easy to grow, even for beginning gardeners. There is nothing more discouraging than spending money and time building your raised bed, with little to show for it.

Great options for new raised bed gardeners?
Beans, peas and cucumbers, which all can be planted along the back wall of your bed and provide a good yield per plant. Depending upon what zone you live in, peas and beans can be planted from seed, twice a year for a double harvest. Tomatoes, zucchini and peppers are also great options, as are salad greens and herbs like basil and oregano.
Beans, peas and cucumbers, which all can be planted along the back wall of your bed and provide a good yield per plant. Depending upon what zone you live in, peas and beans can be planted from seed, twice a year for a double harvest. Tomatoes, zucchini and peppers are also great options, as are salad greens and herbs like basil and oregano.
Money Saving Tips
Remember those neighbors who you got to join you on your raised bed journey? Instead of everyone planting the same thing, form your own mini co-op, with each person being responsible for different fruits, vegetables and herbs.
Even though individually you may have small raised beds, combined it will be like having a huge garden. You could even take turns hosting a "pot-luck" style dinner, using stuff from your gardens of course, that will double as the weekly "harvest exchange."
You could also simply go shopping together and share expenses.
Many vegetables are less expensive when sold in flats, but for a home vegetable garden you may not need that many. For example, split a package of six zucchini, cucumbers or tomatoes with a friend. This will also make it easier to have different varieties in your garden with out over spending, or over planting.
Besides thinking about plants that have a large yield, consider ones that can be frozen or canned so you can enjoy the fruits of your labor all winter long.
This won't save you money on the bed, but it will save on shopping expenses. This is another project you can do with your co-op. Either set up one big group canning day, taking turns going to each other's house to help. Or let each person handle canning/freezing their own harvest and sharing with the group.
Many gardeners swear by starting plants from seed indoors.
It's absolutely a great way to save on costs of plants, but only if you do it right, This means investing in some type of overhead lighting unless you have a greenhouse.
Me personally, I have yet to master starting anything from seed, other than greens, peas and beans (which go right into the ground), and basil. I can't tell you how much money I have wasted, mostly because I didn't invest in the lighting. I also don't have a enough space inside, so the dining room table was taken over! Next year, I'm thinking about getting a mini-green house that would fit nicely on my deck.
Starting from seeds is a good way to save money, but if you're going this route, do your research first and determine whether this is something you want to tackle.
How Do I Keep Pests Out of My Raised Garden?
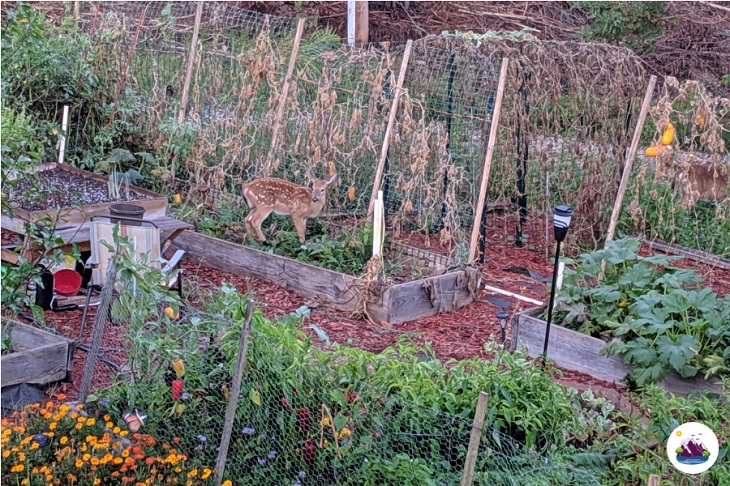
Deer stayed out during peek season, but as things died off, they got more daring. Gates go up next year!
When you put time and money into a raised bed garden, the last thing you want is to have it attacked by pests such as insects, rabbits, cats, deer, squirrels, and burrowing animals.
This is a subject that could take up an entire article itself (and we will have one in the future), but for now, let's hit some of the highlights.

Building a Wood Raised Bed: Step-By-Step
Raised vegetable garden beds are more productive and easier to maintain than traditional gardens.
Now that you have an idea of how big your raised garden bed should be and the right size of wood to use, it’s time to get down to work and construct your garden bed.
There are 4 main steps to constructing a basic raised bed garden: getting the location ready, constructing the frame (which includes cutting the pieces and pre-drilling if needed), adding support to your frame and positioning the raised bed.
Includes Bonus: How To Grow Organic Vegetables
If you follow the steps below, you will be ready to add soil and start planting in no time. Please note, these steps are for a basic raised bed, constructed of single side boards.
Looking for something more than a simple square or rectangle raised bed or want to go higher than a single side board?
Take a look at my tips for advanced design that follows these instructions.
Or take a look at Ideas 4 Landscaping. I have been checking it out and it has tons of ideas (I'll be writing a review on it soon).
Step 1: Prepare the Location
By now you should have chosen a spot that gets adequate sun for the plants you want to grow, now we need to take a look at the ground in that area.
One of the main benefits of raised bed gardening is that it can compensate for poor soil conditions because you will be filling it up. Although a raised garden is always better set up on soft ground (better drainage and root growth), it can also be set up virtually anywhere, provided it has enough exposure to sunlight. As long as your frame is high enough to support proper root growth, you can even put a raised bed frame on concrete or bricks!
For a raised bed garden that is going on a soil surface, one thing you will need to ask yourself is whether the base soil is “decent.”
If it is, it can cut down on how much soil you need to purchase the first year. We recommend conducting a soil drainage test before you get started — you can find details on how to do this in my Flower Bed Guide, which also has a lot of great information about selecting the ideal location that also applies to vegetable gardens.
If the drainage is poor, you'll need to either “build-up” or till and amend the base layer.
By the way, some people like to do the tilling of the inner area ahead of time, others prefer to do it once the frame is constructed — ultimately it’s up to you, and if you are not using the base soil as part of the growing medium for your plants, you won’t even have to do any tilling at all.
Another thing you need to consider is how level the area is, especially if you are building a larger raised bed.
Now, you don’t have to level out the entire area, but if one side is significantly higher than the other, you will need to either dig out the higher side some, or add something on the opposite side to raise it up — this can either be dirt, bricks, rocks or pressure-treated 2 x 4's — the bottom line is that you want the bed frame to lay flat against the surface.
Related to this, you will need to decide whether you want the frame to sit flush against the ground or to be sunken in a little bit.
A benefit of an inset raised bed is that it provides an additional barrier to weeds and burrowing animals who could potentially crawl under and invade your garden. Even a one-inch furrow around the edge is helpful. If the base soil quality is decent, you may even want to go a bit deep to reduce the amount of soil you need to add.
NOTE: You don’t want to actually till the lines of the bed because this will create really loose soil and the bed will sink as the soil compacts with time and water.
If you are not digging a trench, it’s a good idea to draw an outline of where the bed will go, either with a small furrow, or you can mark the lines with sand, flour, or turf marking paint.
Finally, within the main bed area, you will need to clear out any large debris and rocks.
If you are not using the base soil as part of the “growing space” for the plants, you may want to add a layer of weed-barrier cloth across the entire area. We recommend having it extend about 6 inches beyond the outer frame to provide a layer of protection from weeds on the outside of your garden. Putting this down before you place the bed frame will not only hold it in place, but it will ensure that there are no gaps along the edge of your garden bed.
Even if you are building a raised bed that will utilize the surface soil, laying down a strip of weed-barrier along the frame lines is a good idea, with it extending about 4 inches on the inside border. You may want to wait until step 4 to put down the cloth, so you avoid stepping on it while working, but we wanted to mention it here, so you are prepared for it when the time comes.
IMPORTANT: If you are planning on adding an irrigation system, or drip hose system for watering, you will need to take this into consideration before you place your bed and fill it with soil. For example, will you need to cut an opening somewhere in the frame for the pipes or hose?

Supports along the outer edge double as barrier for animals, and structure for vining vegetables.
Step 2: Determine What Support Your Bed Will Need
Before we talk about constructing the frame, we need to discuss support.
Let’s start with corner support.
No matter what kind of wood you use, over time there will be some bowing, and stretching. For larger beds, this may even happen right away after your first heavy watering (especially if you don't use the right kind of screws) because the soil puts a lot of outward pressure on the frame. There are several options for corner support.
Some people like to use either 2 x 4’s or 4 x 4’s, cut to match the height of the side boards, placed in each corner. This type of corner support is definitely recommended for taller beds where the sides are constructed using two or more boards for added height because they not only provide the corner support, but they also serve as the method of attaching the boards together.
Another option for smaller beds is strip of wood, typically either a 1” x 1” or 1’ x 2”, that is attached across each corner at a diagonal (creating what looks like a little triangle).
The “problem” with this method is that it requires diagonal cuts on the ends of each piece of wood with is a little bit more complex. It can either be done with a miter box, or if you are not looking for perfection, you can attach the board with a slight overhang and cut the ends as flush as you can. Either way, if you opt for this method, wait until the box has been constructed so you can accurately measure the strips.
Another option is to use metal corner brackets — and there are two ways you can go.
Hardware stores sell flat L-shaped brackets which you would attach either to the bottom of the bed frame, or the top, or both, depending upon the look you want, and how big the bed is (for larger beds, we would recommend using both).
Or, there are what’s called “wood to wood” corner brackets that are designed to go on the outside corners of your garden bed — some of which can add quite a nice decorative look to your raised garden bed.
Now we need to talk about inner support for your raised bed.
In terms of inner support, what you need will depend upon the size of your bed. For now, we are only going to discuss what’s needed for beds that are 6 feet or shorter (we’ll cover longer bed support in a bit, when we discuss advanced bed design).
Smaller raised beds that are placed upon soil surfaces can shift over time, especially in areas with a lot of rain.
One solution, that we discussed earlier is to dig a small trench and sink the bed into the ground a little bit.
Another suggestion is to add side supports from either 1” x 1” or 1” x 2” wood, that extend about 6 to 8 inches below the bottom frame of your bed, minimally one for each side, depending upon the size of your bed. The ends of these support boards will be cut at a diagonal, so that they can be pounded and stuck into the ground to prevent your bed from moving.
NOTE: Using this type of side support will mean you need to flip over the raised bed frame once it’s completed, so you will definitely need help.
Want to grow fresh veggies and flowers, but limited space? A raised bed is a perfect solution!
Tutorial: How to Build a Raised Garden Bed | Courtesy of Lowe's Hardware
Step 3: Assemble the Frame of Your Raised Bed
Now that the area is good to go, it’s time to get all the pieces ready and this starts with measuring and cutting the frame.
The beauty of a basic raised bed is because of it’s rectangular square shape, this is not a difficult process. And what’s even better is that if you don’t have the tools (or a vehicle big enough to transport long boards) most lumber stores will cut the wood for you.
If you are building an 8-foot x 4-foot raised bed, it only takes two 12-foot boards to make the frame. Simply take the first board, mark off 8 feet and cut — you now have the pieces you need for one longer, and one shorter side of your bed. Repeat with the other board.
Going for a 6x4-foot bed? Purchase two 10-foot boards, cutting each one at the 6-foot mark (which will give you two 6' and two 4' boards).
To assemble the frame, you will either need an extra piece of hands, or something to clamp the pieces together and hold them tight while you work. If you are using pressure treated wood, you will want to pre-drill holes, a size smaller than your actual screws. Pressure treated wood is prone to splintering, and you want to avoid that at all costs.
NOTE: For larger beds, because of their weight, we strongly suggest constructing the frame as close to possible to its final location because they are heavy and you won’t want to have to move it very far.
The first step is to create an “L” for one side of the bed with one longer, and one shorter piece.
Do the shorter pieces go on the inside, or the outside of the frame?
This is entirely up to you. Putting them on the inside, will produce a “wider” bed because it will add the width of the outer boards to the interior of your bed. Putting them on the outside, will create a bed that is longer.
By the way, if you are going for a "perfect" square bed, you don’t want 4 pieces that are the same size. Two of the boards will have to be cut shorter (by the width of the board times two). For example, if the width of the board is 2 inches, and you want a 6’ x 6’ raised bed, then the two boards that go on the inside will have to be cut to 5 ‘ 8”.
Either clamp the two boards or have your partner hold them while you drill.
When drilling your holes, you don’t want to put them in a straight line, instead offset them a little bit in a zigzag pattern, spacing screws about 3 inches apart. Remember, at this point you are simply constructing the frame and will be adding additional support in each corner.
Now add the corner support.
- If you are using the wooden interior support method, place the 2x4, or 4x4 (which you have measured to match the height of your boards) in the corner of the L, holding it tight with either a clamp your pair of extra hands. Once again, using the zigzag pattern, use screws on each side of the board to attach the side boards to the center support (remembering to pre-drill if you are using pressure treated wood).
- If you are using the flat metal bracket method, attach the bracket along the top, bottom, or both sides of the frame.
- If you are using the metal corner brace method, attach it outside of the L to provide the additional support your bed will need to hold the sides together over time.
Repeat these steps with your other two pieces of wood to create a second L. Be careful to make sure that you attach the longer and shorter boards the same way you did the other one (either inside or outside).
Next, it’s time to combine the two L-shaped structures to construct the box.
To do this, follow the same procedures you used for the individual sections, this time attaching the L's together at the corner.
Finally, it’s time to add the inner supports that go into the ground, if you are using them.
If you are using one per side, measure out where the center is on the side panel and draw a line. If you are using two on the longer side, measure the space in thirds. You will be attaching these so that the pointed end extends out from the bottom of the bed and the opposite side is flush with the top.
It is quite likely that you will need shorter screws than you used for attaching the sides panels together. Drill from the inside, so you have less screws showing along the outer side of your frame (this is purely for aesthetics).
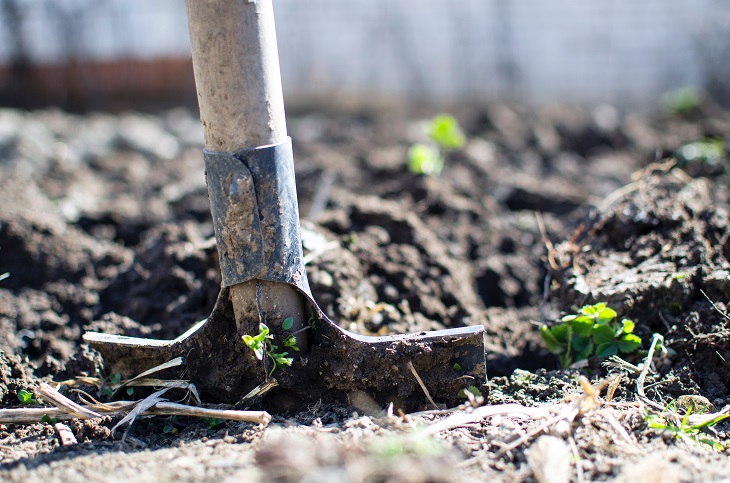
Roots don't do well in compacted soil — tilling below the bed before filling gives them room to grow.
Step 4: Position Your Raised Bed Frame
Once the frame is constructed, there are some optional steps you may want to consider.
Now that those things are taken care of, it’s time to get those helping hands.
- For beds that have the side supports, you are going to need to flip the bed over and lay it down gently. Until it’s in the exact position you want it, you don’t want the support posts to go too far into the ground.
- If you are using the trench method, move the frame to where you want it, adjusting as needed until it’s in the spot you want it.
Once the frame is in position, unless you are placing it on a completely solid surface, you will want to “press” it into the ground some.
This is especially important if you have dug a trench which may have some loose soil in it. For heavier beds (or ones without the side support posts), it may simply mean putting some weight on it along the edges to help it settle into place. A rubber mallet (so as not to damage the wood) is also extremely helpful, especially if you have gone with side supports that need to be pounded into the ground.
It’s up to you, but you may want to pull out a level if you are looking for a perfectly even raised bed frame, adding more pressure to sides that are significantly higher than others.
Finally, back-fill any trenches on either side of the frame with the existing soil from the area so they are even with the surface. You don’t want to waste good soil filling up those empty spaces.
Your raised garden bed is now ready for interior tilling (if you haven’t already and are using the ground below as part of your growing medium), filling with soil and adding an irrigation system, if you are using one.
Advanced Raised Bed Design Ideas
My raised bed garden with chicken wire outer wall (that's my son, he does a lot of the heavy lifting  )
)
Now that we have covered the steps involved with building a basic raised garden box, it's time to take a look at some advanced designs that can take your bed to a whole new level.
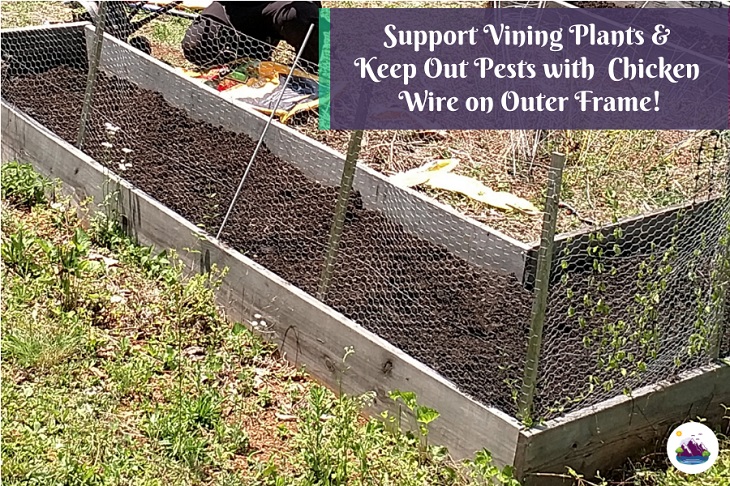
Add Support for Vining Vegetables
To provide support for climbing vegetables, such as cucumbers, beans and peas, along the back side of the bed, attach posts along the inside of your bed, about every 3 to 4 feet.
It’s easiest to add these before you fill the bed with soil.
Choose the height of the posts based upon how high you want to reach and how much the vegetables will spread – figure at least about 6 feet taller than the bed height.
Now you can either staple chicken wire, plastic fencing, or even use string, from post to post to create something for the vegetables to climb on.
That's pickling cucumbers growing along the back fencing, and beans along the right. Yummy!
For a more “finished look” first staple the fencing along the top of the interior side of the bed frame (using a heavy-duty staple gun) laying the extra over the outside edge.
Next, attach the support posts, sandwiching the fencing between it. Next, pull up the fencing and staple it to the posts. It’s much easier to do this with an extra pair of hands to hold it in place while you staple.
Another option?
Instead of using wood attached to the side panels, use metal garden fence posts that are designed specifically for holding chicken wire or other types of fencing. These can be pounded into the ground.
IMPORTANT: When selecting where you will put the vining plant support wall, make sure it’s on the sides of your bed that are away from where the sun is for most of the day.
As they grow, the foliage will fill in the wall, creating shade for anything behind them. Or, if you are looking to create an actual shade barrier for plants that need less sun, you could strategically place them that way too.
Square Foot Gardening in a Raised Bed
Raised beds are a perfect vessel for square foot gardening not only because of the nutrient density of the soil, but also because the side panels are perfect for attaching your markers — and it’s super easy!
- Method 1: Attach small eye hooks at one-foot intervals along the sides of your bed and use these to tie string to mark off the quadrants.
- Method 2: Use thin strips of wood, attached to the top of the frame to create your one-foot areas.
Creating a Taller Raised Bed — Now or In the Future
When constructing a raised bed, you can get boards of varying heights — 4”, 6”, 8”, 10”, 12” and some places even have 18”. But what do you do if you want an even taller bed, or perhaps you want to start shorter because of budget constraints but want the ability to expand later?
The good news is that you can create whatever height you wanted by using 2x4's or 4x4's to connect boards together to create taller panels.
NOTE: These instructions assume your shorter side panels will be going on the outside of the frame. If you are placing them on the inside of the frame, you will want to use the shorter side panels for this step.
Before start construction the box, lay the longer side panels for one side of the bed on a flat surface. Cut two support boards the height of the combined side panels — for longer beds, you will need to cut a third piece for the center. During the final construction, these will be one the inside of the bed.
Place one support piece on each end of the boards, ensuring that it sits flush with the outer edge. For stability, you will want to screw the side boards from the outside into the support board, and there are a few ways to do this.
- Clamp the boards together firmly and then carefully flip the panel over.
- Use a nail or screw, one for each board, to hold the pieces together so you can flip it over.
- Get a partner who can hold the pieces together while you work, and put the support pieces down first, and lay the side panels on top.
Now, screw the side panels to the support board, using a slight zigzag pattern instead of placing all the screws in a straight line.
Once the two end supports are attached, if you are using a third center support, draw a line in the middle of the board, and use screws to attach it to the side panels.
Repeat these steps to create the opposite side panel.
Now you can now start creating your “L’s” for the frame, but this time you will have to attach one board at time — and you will be drilling both into the main side panel and the center support.
If your other side panels are longer than 4 feet, you have two options.
- You can attach the individual pieces together with a center support before you start construction.
- Or, once you have created the box, you can add the center support while the box is standing up.
What if you want to start short your first year and expand later?
When cutting your corner and center supports, simply cut them to be longer than the current height of the bed by how much more you plan to add in the future. Starting with 6” boards but plan ultimately having a foot-high bed? Cut the 12” supports.
Yes, these will be sticking up out of your bed until you are ready, but that’s okay — you know their purpose and won’t mind. Another option is to use 4x4s instead of 2x4’s which cost a little bit more, but because of their square shape, they are more conducive to adding temporary decorative touches like beveled wooden cap or spindle.
Interior Support for Longer Beds
The longer your raised bed garden is, the more pressure it will have to bear from the weight of the soil and water — and this is especially true for taller raised beds.
For beds with side panels constructed from more than one board to increase the height, the center supports are designed to hold the panels but will not provide what is needed to prevent outward expansion and bowing due to pressure from inside the bed pushing outwards.
For this, we are going to need provide interior support that will help to hold the two longer sides of the bed frame stay together in that perfect box shaped.
Once your frame is constructed and before you set it firmly into the ground, measure the distance on the interior of your frame from one side to the other.
This has to be exact, because we are going to use 2x4’s that will slide down into the box. No matter how “perfect” you are at putting the box together, there are variations in wood that can make slight differences in the interior width. A good guideline for longer beds is to add an interior support every 3 to 4 feet. So, for a 6 to 8-foot bed, you would want one interior support. For a 12-foot-long bed, you would want two inner cross-support posts.
Once you have measured and cut the wood, place it inside the bed so that it’s level with the bottom of the frame and attach it with screws from the outside of the frame.
For shallower beds, if you plan on using a motorized tiller in later years, you will want to mark where this support post is on the frame so that you keep that in mind if your bed is not as deep as the depth of the tiller. You can either paint a line on the interior of your bed or use a stake to mark where it is. For deeper beds you don’t have to worry about the tiller hitting the cross-support.
Another Option?
If you are planning on square foot gardening, you could place the cross supports at the top, to mark off some of the main sections, utilizing smaller width pieces of wood or string to mark of the one-foot sections.
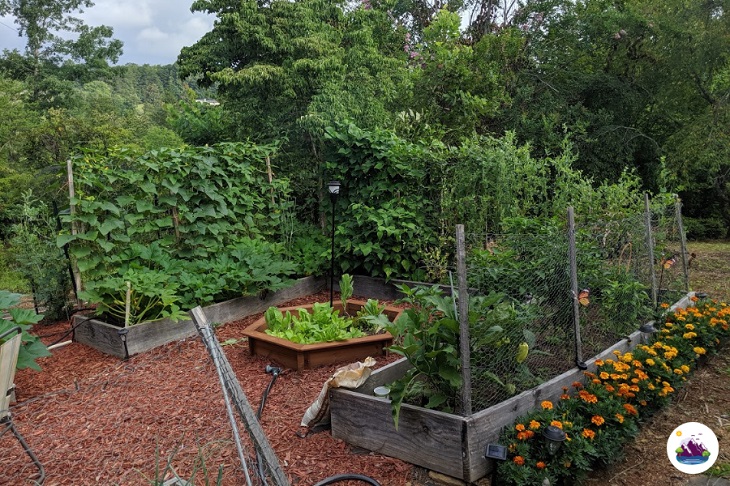
Ultimate Raised Bed Garden to Keep Animals Out
This advanced design technique builds from some of the other design strategies and it’s the one that I have personally used with my own raised bed garden (well, I still have to build the gates!).
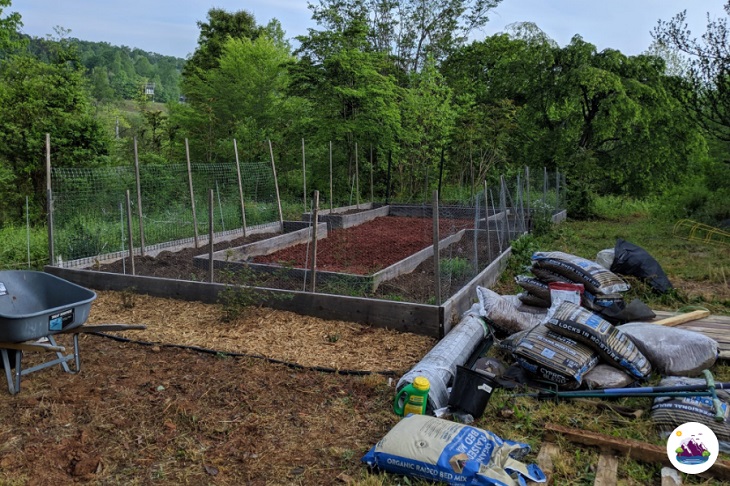
My extra large raised bed garden with support posts and exterior fencing.
UPDATE: I will probably be changing out some of my side supports to stronger 2 x 4's — my cucumbers were so plentiful last season that the smaller supports are giving way. They lasted 3 years though.
For smaller beds, you could simply put the same type of fencing for vining plants and go all the way around your bed. The only problem with this is that you will have to reach over the fence to work in the garden. Some people create removable structures, with stakes that go into the ground, that can be lifted up and out of the way for planting, weeding and harvesting.
If you have enough room for a larger bed, consider creating a “U-shaped Frame.”
This can be done as part of the original design, which does take a bit more strategic planning. Or, you could simply create 3 separate beds with two longer ones on each side, and one smaller one to create the base of the U.
Next, use your desired strategy to add fencing along the outside edge of the entire frame — but on the 3 interior sides. For the sides where you want to grow vining vegetables, you may want to go taller. For mine, I used 4-foot chicken wire on the main sides and went 8 feet tall on the sides that are away from the sun for plants to grow and spread.
Now what about the opening of the U? You are going to add a gate!
You will need to attach a solid support beam on each side of the frame — one side will be where the gate attaches, and the other will be for the closure. Alternatively, you could purchase actual gate posts and use those. For the gate, you can either purchase something simple that is pre-made (adjusting the width of the support beam accordingly so it fits.
Or you can build your own.
- Using the same principles you used to build the frame of your bed, create a “box” that is the width of your opening, and as tall as you want it, only this time you will be using either 2 x 4’s or 2 x 1’s depending upon how sturdy you want it to be.
- For larger gates, you will want to add at least one cross-support, or you could get fancy and add two additional ones to make a “plus sign” in the middle.
- Next staple chicken wire, to one side of the gate frame. For a nicer finish, and to protect from the sharp edges, you can attach thin strips of wood along the edge to sandwich the chicken wire in between.
- Finally, you will need to attach hinges on one side and a closure on the other (following the instructions for the type you chose).
And Voila! No more deer, rabbits or cats in your garden.
Sadly, the squirrels can still climb over the fence, so you will have to use other methods to keep them away if they are a problem for you.
For my personal raised garden, I actually created two U’s and placed them horizontally with 4 feet between each side and will be putting a gate on each side between them, not in the actual U opening.
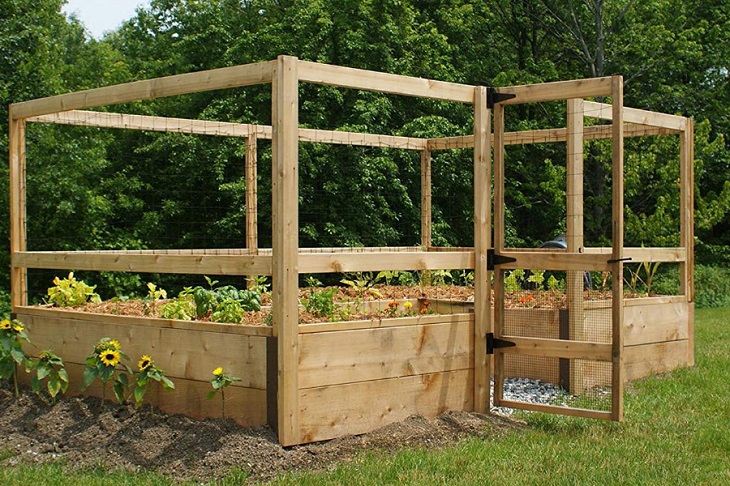
To give you an idea of what the "Gated U" will look like, here's a pre-fabricated raised bed garden kit from Outdoor Living Today that has them:

Gated Cedar Raised Bed Kit with Gates from Outdoor Living Today
Compared to the bed design above, my actual bed is much lower (less soil to fill it), so I will have to add supports to hold the gate.
And I can always still go up on my bed!
Gardens to Grow also sells a kit that has everything you need but the lumber for a gated raised bed garden. It comes with instructions, plan, hardware, netting and everything else you need if you are not good with designing.
Deer Proof Raised Garden Bed Kit (Just add Lumber) by Gardens to Grow
Now that the frame is built, it’s time to fill the garden bed with a mixture of compost and nutrient-rich soil.
The soil is an important ingredient, yet so tricky when it comes to the proper mixture and composition. You might be a pro when it comes to building your garden bed, but growing anything in it is determined by how well you prepare your soil. You need to have the right blend or combination of soil.
Here’s a low cost, DIY soil blend that will guarantee your plants adequate nutrients and healthy growth.
Perfect Soil Recipe Blend
Yields Enough for a 4 by 8 foot, 9-inch Deep Raised Bed
Since building this garden and preparing the soil for your plants to go hand in hand, here's a few useful tips that will help you through.
You can definitely save money and provide better nutrients for you plants by creating your own compost.
A Few Final Words...

I love going into the garden every morning with my cup of coffee and collecting the harvest for the day!
“I grow plants for many reasons: to please my eye or to please my soul, to challenge the elements or to challenge my patience, for novelty or for nostalgia, but mostly for the joy in seeing them grow.”
- David Hobson -
Congratulations for making it this far — you are now a few steps from having your own garden! As you have seen, building a raised garden bed doesn’t have to be difficult, provided you have the required materials and a little knowledge on how to go about the process.
This guide is specific for a standard-size raised garden bed, but you can use it to build a much bigger one. All you will need is more wood for the frame and a larger chunk of soil. When it comes to planting, the process may differ from one plant to another. For instance, some plants need looser soil, while others may require you to have more compact soil.
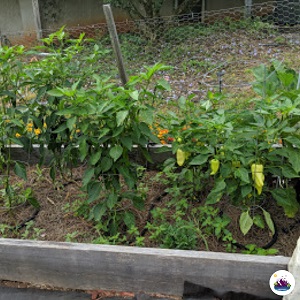
My lovely pepper plants ready to start picking!
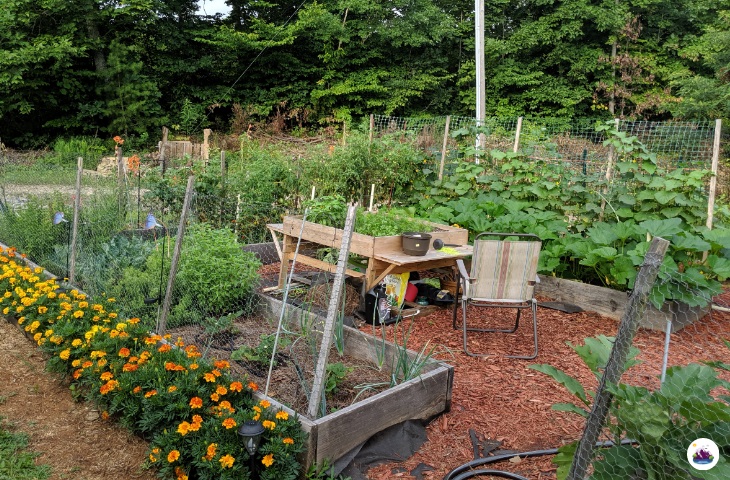
In case you are wondering, the basket of veggies are sitting on the elevated raised bed kit from Giantex.
I built it in the center of my ground level raised garden to grow herbs, scallions and baby carrots. It also provides a place from me to store things underneath, a work space and a spot to place my morning coffee!
There’s nothing sweeter and more fulfilling that enjoying a meal made from veggies and fruits you have nurtured from the get-go.
Don’t let another spring pass without putting your gardening and farming skills to the test.
Get your hands dirty and enjoy the fruits of your labor!
And with that, I am leaving you with one more money saving tip about Hugelkultur, a strategy I am implementing next growing season with a few new beds I will be adding.
What is Hugelkultur?, you say.
Hugelkultur is a form of gardening used for 100's of years in Eastern Europe and Germany.
In short, you fill the bottom of your raised bed with organic, compostable materials such twigs, wood, dried leaves, grass clippings, food scraps — the same types of things you would put in a compost pile.
For deeper raised beds, if you have access to logs, this is a great way to fill the bottom layer. Then you simply let nature take its course.
I am still learning about this process, but I'll let you know how it goes!
Video: Save money on soil and compost by making your own the Hugelkultur way
The Basic Principles Behind Building Hugelkultur Raised Bed Gardens | Courtesy of Plant Abundance